
Penny Pinching Tech Tips.

Penny Pinching Tech Tips.
![]() by RebStew February 27th 2012, 4:01 pm
by RebStew February 27th 2012, 4:01 pm
When I was a teenager we drove low riders. Not cause they were cool or we bought drop spindles. We had low riders cause our springs where broken down.
We drove wagons. Long roofs now are in style. Wagons back then were not cool they were hand me downs from dad or they where cheap to buy out of the paper. Remember reading the paper to find a car?
We had rat rods! We didn't build rat rods we just could afford to fix up our junk!
We had primer on our cars. Not cause it was in style but because we couldn't afford to do all the body work and paint it.
Self tinted our windows, sometimes not the right way. I remember a cop sticking his face against my big side glass on my 67 Tempest wagon and asking me if I could see out of that tint. YES! I can! Really I couldn't. Not at all. I couldn't afford window tint for all the glass so the very back big ones I spray painted them with 97 cent black paint.
We had suede or flat color paint long before it was in style. Why? Becuse we got tire of grey, black or red primered cars. I remember trying to get ready to take the T bird to TN and was primering it. I had some red and blue paint from a guys car I painted. I tossed it in with the grey primer and we ended up with a purple suede 65 T bird.
The cars I had and most of my friends had where not hi dollar machines but they where friggin' cool! We built them on a budget and had fun doing it!
The reason for the rant is hot rodding has become such a hi dollar, gold chainer hobby. Getting back to doing the work yourself and building something cool is what it's about.
If you have any low buck ideas please post them here.

RebStew- Scrounger's Pitbull On Nitrous
- Number of posts : 12420
Registration date : 2007-10-09
Age : 95
Location : Newport Ky
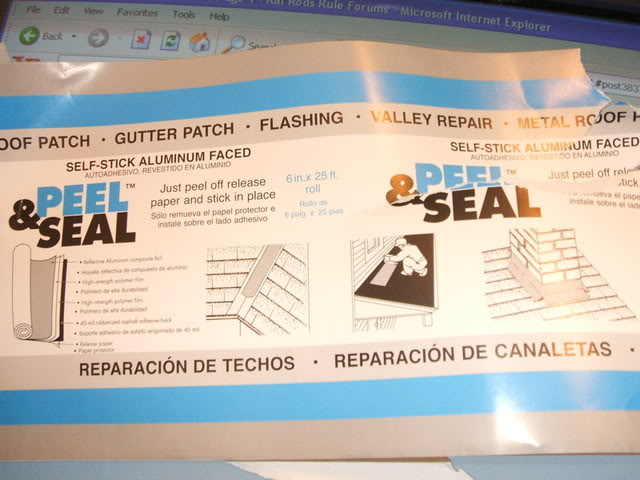
Peel & Seal is the cheap alternative to Dynamat.
![]() by RebStew February 27th 2012, 4:03 pm
by RebStew February 27th 2012, 4:03 pm
I started putting my fake Dynamat down. This is the stuff that they have been talking about on HAMB and a few other forums. I paid less than $15.00 for a 6in. X 24ft. roll. It's very, very close to Dynamat other than the price. It has a 40 mil rubberized aspalt sticky back, two layers of high stregth polymer film over a reflective aluminum surface.

Any

I was worried a little about how good it would stick. I pre cut what I needed then I used a heat gun on the backing. Let me tell you!! When you stick it on you can't get it off. Even if it just bearley touches it. Make sure you have it all lined up before you touch anything with the backing.You can use a wall paper wheel to smooth it out. I didn't have one so I used an unopen pop can. As you can see from the bead rolls in the floor it takes the shape of where up put it. Cool thing is this stuff is used for flashing and as a roof patch. Any small holes you may have this will seal them and not let the water in. They do sell a better version of the Dynamat. It is the sound and heat Dynamatt. It is almost twice as thick as the original. No problem. For the price difference put a second layer over this one. Even with the floor half done I can tell a difference in how it sounded when I close the truck door.
this may help you if you go looking for it..
If you can't find it at your local hardware here's a link where you can order it. http://www.abccatalog.com/store/viewitem.asp?idproduct=2579952312
RebStew- Scrounger's Pitbull On Nitrous
- Number of posts : 12420
Registration date : 2007-10-09
Age : 95
Location : Newport Ky
Re: Penny Pinching Tech Tips.
![]() by Reb Stew May 2nd 2012, 6:48 am
by Reb Stew May 2nd 2012, 6:48 am
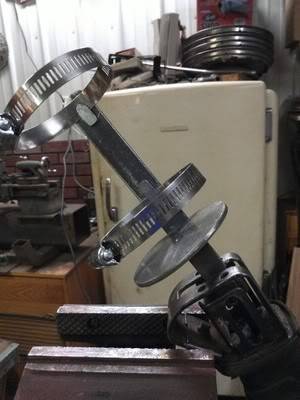
The top basket cut off.

The swing out was flip over and used to hold my body hammers and dollies. Clamps are on the side. Place for the helmets and room on the sides of the welder for welding gloves, aprons ect ect


Reb Stew- National President
- Number of posts : 7905
Registration date : 2012-04-08
Age : 104
Location : Looking in your window
Re: Penny Pinching Tech Tips.
![]() by Chris55 May 2nd 2012, 6:20 pm
by Chris55 May 2nd 2012, 6:20 pm

Chris55- FL Chapter President
- Number of posts : 1360
Registration date : 2010-04-16
Age : 58
Location : Geneva, Florida
Re: Penny Pinching Tech Tips.
![]() by mpvance May 15th 2012, 10:44 pm
by mpvance May 15th 2012, 10:44 pm

mpvance- Car washer
- Number of posts : 26
Registration date : 2011-05-27
Age : 64
Location : Central KY
Re: Penny Pinching Tech Tips.
![]() by JRiggs June 25th 2012, 7:15 am
by JRiggs June 25th 2012, 7:15 am
RebStew wrote:
We had suede or flat color paint long before it was in style. Why? Becuse we got tire of grey, black or red primered cars. I remember trying to get ready to take the T bird to TN and was primering it. I had some red and blue paint from a guys car I painted. I tossed it in with the grey primer and we ended up with a purple suede 65 T bird.
man i liked the "PURPLE PEOPLE EATER"

JRiggs- Scrounger
- Number of posts : 3505
Registration date : 2007-10-09
Age : 44
Location : erlanger ky
Re: Penny Pinching Tech Tips.
![]() by DEMONSPEED June 26th 2012, 8:13 am
by DEMONSPEED June 26th 2012, 8:13 am

DEMONSPEED- Scrounger
- Number of posts : 420
Registration date : 2009-05-30
Age : 29
Location : Interzone
Re: Penny Pinching Tech Tips.
![]() by Reb Stew June 26th 2012, 3:57 pm
by Reb Stew June 26th 2012, 3:57 pm
Reb Stew- National President
- Number of posts : 7905
Registration date : 2012-04-08
Age : 104
Location : Looking in your window
Re: Penny Pinching Tech Tips.
![]() by Reb Stew September 17th 2012, 8:05 pm
by Reb Stew September 17th 2012, 8:05 pm


Reb Stew- National President
- Number of posts : 7905
Registration date : 2012-04-08
Age : 104
Location : Looking in your window
Re: Penny Pinching Tech Tips.
![]() by Brownie September 17th 2012, 8:08 pm
by Brownie September 17th 2012, 8:08 pm

Brownie- Scrounger
- Number of posts : 941
Registration date : 2011-11-30
Age : 53
Location : Port Charlotte Florida
Re: Penny Pinching Tech Tips.
![]() by dieseldr November 24th 2012, 3:44 am
by dieseldr November 24th 2012, 3:44 am
Couldn't find a back up light switch for my '69 Mach I that I could justify the price, that had the bracket with it, so bent a piece of 18 gauge to hook over the shifter bolt, drilled it to fasten a Jacobs engine brake micro switch to it (you could rob {borrow} one of these out of just about any heavy truck salvage yard), lined it up and bent the bracket so that when the reverse lever comes back to the reverse position, it pushes the button on the micro switch and powers the backup lights. I think it cost me a grand total of about 6 feet of 16 gauge wire to run from the firewall connector down to the trans shifter to get backup lights working. And a couple of bullet connectors. I could go on for hours 'splaining the special tools for large engine overhaul that myself and a couple other guys have built to avoid paying out long dollars to do something on the cheap, or in the field when we didn't have the time to wait 4 days for something to be shipped in. Sometimes it isn't the cost, it is the investment of time waiting for stuff to show up- and if you don't have the time, you start on your own making what will work.

dieseldr- Hot Rod Builder
- Number of posts : 603
Registration date : 2011-03-20
Age : 61
Location : Western NY
Re: Penny Pinching Tech Tips.
![]() by Arieldouglas November 24th 2012, 4:31 am
by Arieldouglas November 24th 2012, 4:31 am
dieseldr wrote: I could go on for hours 'splaining the special tools for large engine overhaul that myself and a couple other guys have built .
Well, Start 'splaining! Home made tools are wonderfully adaptable.

Arieldouglas- TN Chapter President
- Number of posts : 1915
Registration date : 2011-07-03
Age : 65
Location : Watertown, TN
Re: Penny Pinching Tech Tips.
![]() by Arieldouglas November 24th 2012, 4:32 am
by Arieldouglas November 24th 2012, 4:32 am
Reb Stew wrote:I seen this on another forum and had to share. I'm going to make one. Paint can shaker. Yea I know it's the lazy way out.
I love this! I hate shaking rattle cans.
Arieldouglas- TN Chapter President
- Number of posts : 1915
Registration date : 2011-07-03
Age : 65
Location : Watertown, TN
Re: Penny Pinching Tech Tips.
![]() by dieseldr November 24th 2012, 11:36 pm
by dieseldr November 24th 2012, 11:36 pm
dieseldr- Hot Rod Builder
- Number of posts : 603
Registration date : 2011-03-20
Age : 61
Location : Western NY
Re: Penny Pinching Tech Tips.
![]() by dieseldr November 25th 2012, 12:06 am
by dieseldr November 25th 2012, 12:06 am
Materials required..... 2 cinder (cement) blocks
Kite string
Measuring device
Place the blocks (or other heavy device) in front of the vehicle about 5 feet out front of each wheel. Tie the kite string to one block, walk around the rear of the vehicle with the string and come back to the front on the opposite side you started. Walk back to the rear axle without the string, and when you get to the rear end you will pull it tight down one side of the car, set it against the rear tire sidewall about 2/5 up the height of the tire, hold tension on it, do the same on the other rear wheel, keep tension on the string, walk to the last wheel up front and tie the string to the block with tension on the string. The trick is to keep the string tight, if it goes slack it falls to the floor and you start over. Align the string along the rear sidwalls until it just touches the sidewall on the front of the rear tire- do this by sliding the blocks sideways to get the string where you want it on the rear sidewall. This will be your reference to measure front toe in from--- see where I'm going with this? Once the string is set to straight ahead on the rear wheel sidewall, this is your reference to find zero toe for the front end off a measurement from the string to the front tire side wall. By the way, most vehicles usually run 1/16 to 3/16 toe in. And remember, on 1/8 toe total, split it between both fronts.... 1/16 each. Set your preload through center in the steering gear, center your steering wheel, then do the "string alignment", and you should end up with a car that runs down the road fairly straight, the steering wheel fairly straight, or at least close enough you can now fine tune it. Now if your caster/camber is off, this won't help a bit, but if you put all new tie rods, ends, drag links, etc on and want to get it so you can drive it, this will work.... it may surprise you just how good it does work. I find it to be much more accurate than the old "scuff boards" we used to have to use for NYS inspection, (which used to read side scuff in inches or feet per mile) and as accurate as anything anybody else has been using around here.
dieseldr- Hot Rod Builder
- Number of posts : 603
Registration date : 2011-03-20
Age : 61
Location : Western NY
Reb Stew- National President
- Number of posts : 7905
Registration date : 2012-04-08
Age : 104
Location : Looking in your window
Re: Penny Pinching Tech Tips.
![]() by Nanook December 15th 2012, 9:06 pm
by Nanook December 15th 2012, 9:06 pm
SOS pads work incredibly well to clean up any cast metal parts. And it gets it done FAST! Keep it off of chrome or billet aluminum though.
Later,
Lee

Nanook- Scrounger
- Number of posts : 1088
Registration date : 2010-06-28
Age : 52
Location : Walton, KY
Re: Penny Pinching Tech Tips.
![]() by dieseldr December 16th 2012, 2:12 am
by dieseldr December 16th 2012, 2:12 am
dieseldr- Hot Rod Builder
- Number of posts : 603
Registration date : 2011-03-20
Age : 61
Location : Western NY
Re: Penny Pinching Tech Tips.
![]() by Truxter Fordly December 16th 2012, 3:50 am
by Truxter Fordly December 16th 2012, 3:50 am
dieseldr wrote:Off topic, but, I see your signature and the Super Duty remark... no greater factory racers were ever built, but my mind can't help but try to remember when Ford used "super duty" on their medium/heavy trucks back in the day. I almost think it was '59, can anyone shed some light on this? Not trying to start anything, but just curious when that designation came about on the Ford trucks. Of course, over the years Ford stopped using it, and picked it up later in life. Sorry for hijacking the thread, but trying to get a little history lesson here. Thanks all.
Ford came out with 3 new V8 gas engines of 401, 477 and 534 CID for their big truck lines in 1958 and labeled them Super Duty. These engines were found in those tilt cab C.O.E. tractors that Ford made so many of up into at least the mid '60's and they probably were used in the normal (not flat fronted) tractors too. In the book I am getting this info from (Ford Spotter's Guide 1920-1992) the last Super Duty Reference as it pertains to big trucks is with the '62 models but that doesn't mean that it's use stopped then.
Now let's get back to saving some $$$

Truxter Fordly- OH Chapter President
- Number of posts : 424
Registration date : 2009-10-21
Age : 65
Location : Loveland, OH
Re: Penny Pinching Tech Tips.
![]() by Kentucky Kid August 6th 2013, 12:47 am
by Kentucky Kid August 6th 2013, 12:47 am
1) I use an aluminum heat sink sourced from a frequency drive for plug welding old trim holes. Hold the flat side on the outside of the panel, and there's virtually no grinding, as the weld will not adhere to the aluminum, and if you're quick about it the sheetmetal wont get hot enough to warp.
2) You can tear down an old distributor to build an oil pump priming tool.
3) Chevrolet Vortech trucks with the 5.7, 5.0, and 4.3 liter engines have mini starters that work well with Gen I smallblocks that have headers. Theyre usually $30 something at the junkyard.
4) Late 90's Mercury Mountaineer and V8 Ford Explorers are very common in the you pull yards, and came equipped with the GT-40 302 engines. That makes for a very fair priced roller engine for your project. If nothing else, nab the GT-40P heads for your older 302.
5) F Series gas burners and Broncos from 86 through 96 I think use an inline fuel pump in addition to the in tank pump. It has more than enough pressure and volume to feed my TBI V8, it'll feed your carbed motor. I've never gave more than $10 for one with the harness at the junkyard.
6) GM's TBI engines are notorious for running rich, mostly due to the fact that the O2 sensors never get warm enough to enter closed loop operation. This is why most of them have Service lights on. Replace the one or two wire oxygen sensors with a heated three wire sensor from a 94 or later fullsize truck. Stay away from the four wire variety.
7) Shorten your own driveshaft? Balance it yourself. Drill a hole and tap it to accept a zerk fitting. Load 'er down with grease and drive . The grease will sling around the inside and balance itself. Not 100%, but its close enough for the girls I run with!

Kentucky Kid- S.W. Ky Chapter President
- Number of posts : 119
Registration date : 2011-03-16
Age : 38
Location : Paducah, KY
Reb Stew- National President
- Number of posts : 7905
Registration date : 2012-04-08
Age : 104
Location : Looking in your window
Re: Penny Pinching Tech Tips.
![]() by 307Merc December 8th 2015, 10:45 pm
by 307Merc December 8th 2015, 10:45 pm
307Merc- new kid on the block
- Number of posts : 7
Registration date : 2015-12-04
Age : 47
Location : Casper, WY
Re: Penny Pinching Tech Tips.
![]() by Salty Dog December 11th 2015, 7:53 pm
by Salty Dog December 11th 2015, 7:53 pm
Salty Dog- new kid on the block
- Number of posts : 2
Registration date : 2015-11-10
Re: Penny Pinching Tech Tips.
![]() by 307Merc December 11th 2015, 8:57 pm
by 307Merc December 11th 2015, 8:57 pm
307Merc- new kid on the block
- Number of posts : 7
Registration date : 2015-12-04
Age : 47
Location : Casper, WY
Re: Penny Pinching Tech Tips.
![]() by 911TAZZ December 12th 2015, 8:14 pm
by 911TAZZ December 12th 2015, 8:14 pm

911TAZZ- Scrounger
- Number of posts : 715
Registration date : 2011-11-12
Age : 55
Location : cincinnati
|
|
|